Day 1 - Deployment
Once you start building your own installation beyond ephemeral demo or development purposes, you should take some time to prepare and successfully roll out your deployment.
Guided Deployment Checklist
We provide you with this little checklist of topics and aspects to consider while preparing your setup.
1. Pick your poison
If you never touched a commandline, never thought about why using cloud infrastructure might be a good idea: maybe you should stick with the old, but paved and solid ways of installing complex applications like Dataverse.
Keen to learn new technology? Be part of the future? Want to streamline CI/CD and your application? Continue.
2. Install necessary tools
You will at least need:
- kubectl, at least version 1.14This will be your main tool for all operations in your installation.
- git (or another VCS)Your tool of choice to do revision control for your deployment objects. Using such tools is lege artis.
Depending on your use-case and targeted environment that might be just it. If something else is necessary, it’ll be documented in its respective documentation part.
Hint
Please be aware that this project relies on the use of Kustomize and does not provide a Helm Chart (very different templated approach) nor an Operator (to be done in the future, see issue 182). Pull requests welcome, please get in touch.
3. Grasp some knowledge
If you never used Kubernetes before, but want to deploy to production, you definitely should be reading some docs first. Some starting points:
Please familiarize yourself with the architecture of Dataverse if not already done: it helps a lot knowing how things are connected in a complex application like Dataverse to also understand hosting on Kubernetes.
4. Grab a cluster
You’ll need a running and fully configured Kubernetes cluster.
- Local options:These aren’t necessarily meant for production, but might serve you well fortesting and maybe staging environments.
Deploy your own (production) cluster. Many tools to choose from. Examples:
k3s (+1 for small installations)
Use a managed solution to avoid maintenance burden for the infrastructure.
Many universities and research institutes already offer managed Kubernetes clusters for scientific use.
Some examples by commercial companies:
Please note there is an extensible collection of hints for some of these cloud providers at the Cloud Provider Hints page.
5. Choose persistent identifiers
When you want to register datasets and/or files in your deployment to DataCite, EZID or similar, you will need active accounts. Be sure to have access credentials around. As an alternative, you might want to use the FAKE provider.
See also
For more information on Dataverses supported providers:
6. Build bases and environment overlays
Create an empty repository for your Kubernetes files and add a base layout.
A skeleton is available for you convenience to have a copy-paste starter
in personas/prod-skel:
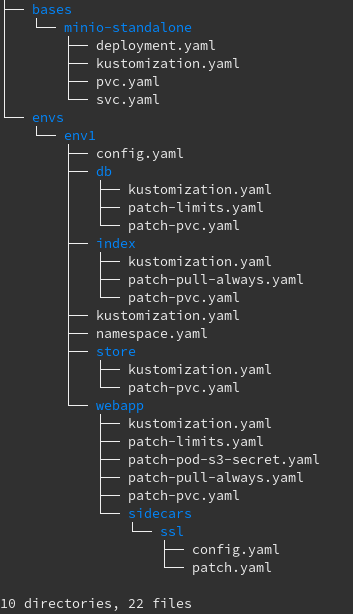
You should make a copy of env1 for both your production and testing environment. Depending on your installation, it might make sense to create your own base.
Tip
The skeleton already provides and example how to add Minio as S3 object store
and add a custom SSL termination endpoint, but lacks an Ingress object.
All of this needs to be adapted in the next step, depending on your cluster
and necessities.
7. Configure and deploy
You now need to change all Configuration, limits, storage classes, etc. depending on your particular deployment.
Make sure to create all the Credentials and Secrets and match names between them.
Once you’re done, DEPLOY! :-) When deployment is ready, you have to run the one-time Bootstrap Job.
kubectl apply -k envs/env1
kubectl create -f https://gitcdn.link/repo/IQSS/dataverse-kubernetes/release/k8s/dataverse/jobs/bootstrap.yaml
More in detail docs about what happens during the deployment can be found at Behind the Scenes.